
Overview – Fast Boot in Windows 11
The Fast Startup Feature in Windows boots the PC faster than a regular boot. In most cases, the fast boot is already enabled on the PC.
It seems that you either want to boot your Windows faster by enabling the fast boot or want to boot the Windows at the normal rate by disabling it or simply check whether or not fast startup is enabled on your version of Windows.
By the end of this article, you’ll be able to disable or enable the fast boot in Windows:
How Does Fast Startup Works in Windows
1. Boot Sequence/Order and Fast Startup in UEFI (Unified Extensible Firmware Interface) Firmware
The user turns on the computer, a power-on-self-test is performed, then, UEFI firmware stored in flash memory on the motherboard is loaded from the hard drive. The boot information including boot entry, and boot order is extracted from the RAM, the Windows boot manager which loads and displays the boot options and initiates, BCD (Boot Configuration Data) file which stores the Windows boot options is read, and the Windows boot loader loads the drivers, finally, the kernel is loaded into the memory via ROM. This is the actual process of loading the OS with UEFI.
In the case of Fast Startup, while shutting down the system, the complete shutdown sequence is followed, the drivers are hibernated instead of shutting down, and the Windows saves the kernel image in Hiberfil.sys file and shut the computer. On the startup, the stored image is loaded from the hibernation file, and only the kernel loads.
2. Boot Sequence/Order and Fast Startup in BIOS (Basic Input Output System) Firmware
The user turns on the computer, a power-on-self-test is performed, the boot device is located, and MBR (Master Boot Record) is loaded into the memory via CPU (Central Processing Unit). Active partitions are located, listed and the PBR (Partition Boot Record) containing the boot code is initiated, and the boot manager comes into play which sets the Boot environment, the BCD file (Boot Configuration Data) containing Windows boot options is read, then, the Windows boot loader loads the drivers are loaded, and finally, the loader transfers the control to the kernel which is further loaded into the memory. This is the process of loading OS with BIOS.
In the case of Fast Startup, while shutting down the system, the complete shutdown sequence is followed, the drivers are hibernated instead of shutting down, and the Windows saves the kernel image in Hiberfil.sys file and shut the computer. On the startup, the stored image is loaded from the hibernation file and only the kernel is loaded.
NOTE: The boot sequence in Windows is explained for a much deeper understanding of how fast startup works (even in different startup environments). Overall, the fast startup works in the same manner, both in the case of BIOS and UEFI firmware, only the boot sequence/order and the boot time varies.
Configure Hibernation Settings in Windows
NOTE: The Fast Boot relies on the hibernation settings, so it’s mandatory to follow this method before moving further to enable/disable fast startup.
1. If you want to enable the fast startup in Windows, run the command prompt as an administrator from the Start menu. Type the command: powercfg.exe /hibernate on and follow the methods below to enable the fast boot.

2. If you want to disable the fast startup in Windows, run the command prompt as an administrator from the Start menu. Type the command: powercfg.exe /hibernate off. Once you disable the hibernation mode, then fast startup will be automatically disabled. Then, you need not follow any other step further to disable fast startup in Windows.

1. Disable or Enable Fast Startup via Control Panel
Step 1: Open the Control Panel from the Start menu.
Step 2: Click the “System and Security” button.

Step 3: Click the “Power Options” button.

Step 4: Click the “Choose what the power buttons do” option from the left sidebar.

Step 5: If the Shutdown Settings are grayed out, click the “Change Settings that are currently unavailable” option at the top.

Step 6: To enable the fast startup in Windows, check the “Turn on Fast Startup (Recommended)” option and click the “Save Changes” button.

Note: If you’ve turned off the hibernation (as stated in the steps in the previous method), you’ll not see the “Fast Startup” Mode listed, which actually means that it’s already disabled.
2. Disable or Enable Fast Startup via Group Policy Editor
Step 1: In the Start menu, search for Edit Group Policy or press the “Windows Logo key + R” key combination to open Windows Run, type: gpedit.msc, and hit the enter key.
Step 2: Navigate to the following path:
Computer Configuration\Administrative Templates\System\Shutdown and double-click the “Require use of fast startup” value on the right pane.

Step 3: To turn on the fast startup, check the “Enabled” option. Check the “Disabled” option if you need to turn off the fast startup.
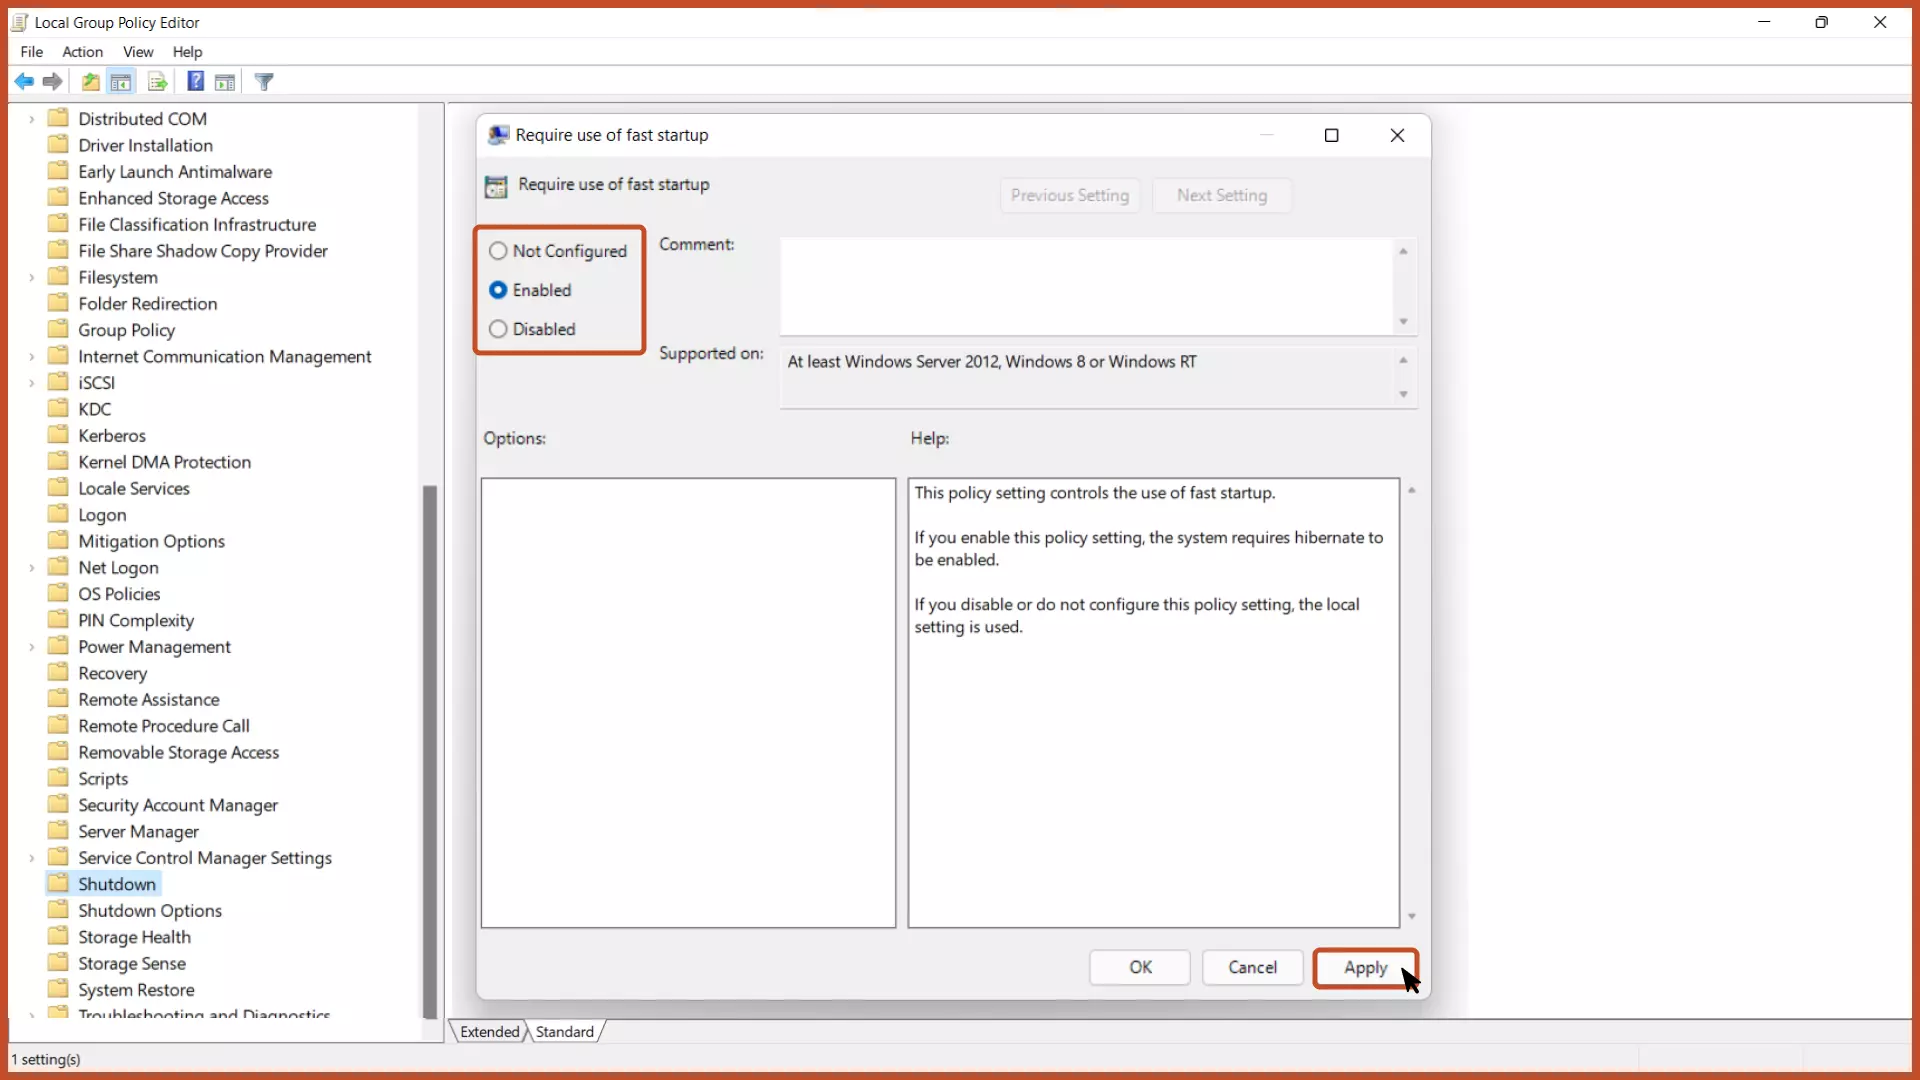
Step 4: To save the changes without restarting your computer, open the Command Prompt from the Start menu as an administrator, type the command: gpupdate/force, and hit the enter key.

Note: The next time you restart your computer, then fast startup will be enabled or disabled depending on the settings. If you’ve disabled the hibernation, you need not to follow this method.
3. Disable or Enable Fast Startup via Registry Editor
Step 1: In the Start menu search for Registry Editor, or press the “Windows Logo key + R” key combination to open Windows Run, type: regedit and hit the enter key.
Step 2: Navigate to the following path:
HKEY_LOCAL_MACHINE\SYSTEM\CurrentControlSet\Control\Session Manager\Power and double-click the HiberbootEnabled value.

Step 3: To enable the fast startup, set the “value data” to 1. Set the value data to 0 if you want to turn off the fast startup.
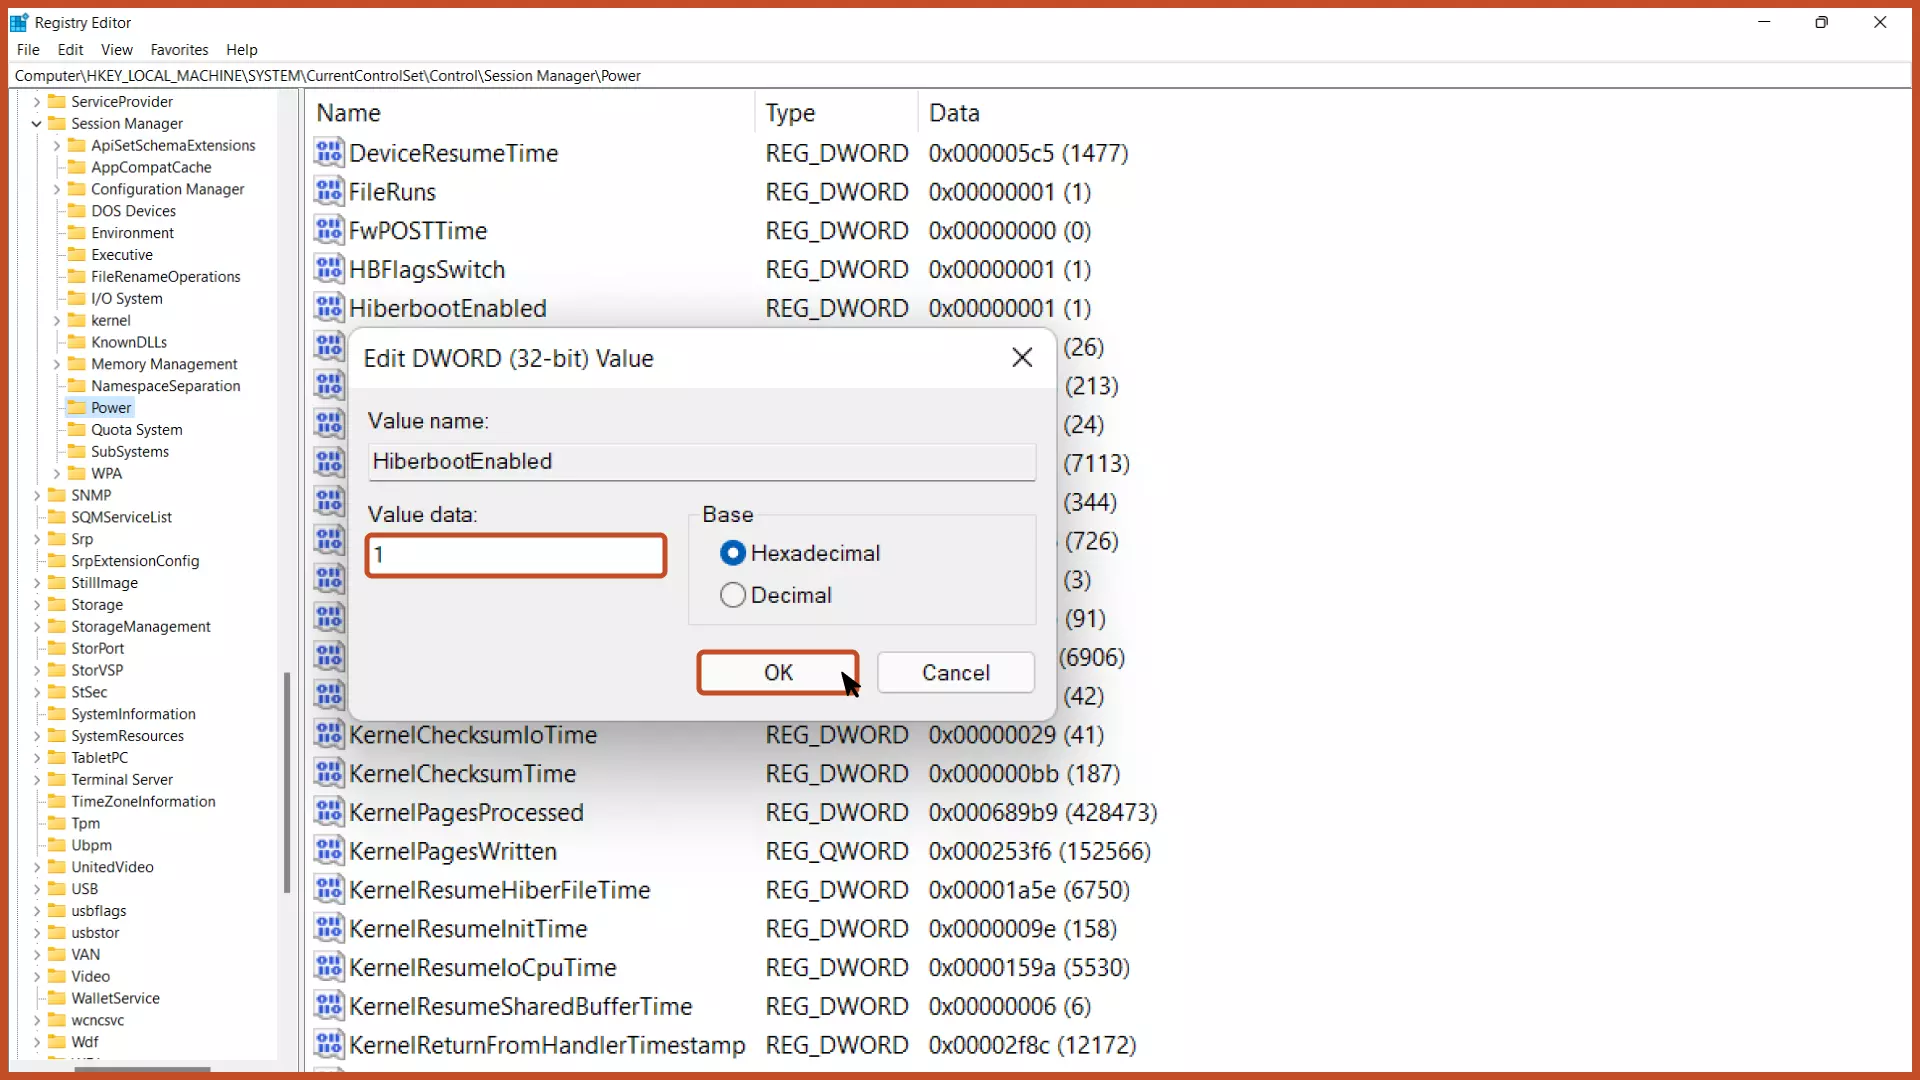
Step 4: Restart your computer to make changes take effect.

Note: If you’ve disabled the hibernation, you need not to follow this method.
Limitations of Fast Startup in Windows
Limitation 1: Enabling the fast boot might cause the Windows updates installation-related issues as the computer doesn’t perform a regular shutdown and doesn’t follow the normal boot order.
Limitation 2: If you’ve dual booted your PC and have more than one OS loaded, the fast boot might’ve compatibility issues.
Limitation 3: Encryption services such as BitLocker securing the OS drives and hard drives with passwords is likely to cause fast startup failures as the data cannot be extracted.
FAQs Related to Fast Startup in Windows
How does fast startup boot the PC faster?
Fast startup is a Windows feature that speeds up the startup of your computer. It stores the state of your computer as temporary files before shutting it down and then rapidly restarts it by accessing the stored temporary files, rather than restarting the computer by following the BIOS/UEFI Boot Sequence/Order (just like in hibernation mode).
Does Fast Startup drains battery?
No, the fast startup doesn’t drain the battery. When the computer is turned off, the processes are stopped. Fast Startup initiates during the boot only when the computer is turned on.
Next Steps
We’ve covered how to disable or enable fast boot in Windows 11. You can use any one of the methods listed above.
Depending on your requirements and limitations stated above, you can decide whether or not to enable/disable fast startup on your PC.
Further, configure the operating system’s built-in settings by referring to the related articles below.
Related Articles

Perform a Clean Boot in Windows 11
Facing some memory issues or BSOD errors? Try performing a clean boot and fix them.

Allocate More RAM To Specific Apps
Learn how to allocate more RAM to specific apps in Windows for increased performance.

Completely Clear Cache in Windows 11
Save some storage on your computer and prevent viewing old webpages by clearing the cache completely.