Overview – BITS in Windows 11
BITS service is mainly used by programmers, hackers, and network administrators in organizations responsible for fetching, downloading, and uploading files over HTTP servers. In the case of Windows, BITS is used to fetch and download Windows Updates from the Windows server and many other services discussed further in this article.
It is a critical component in Windows that aids the system and apps during foreground and background downloads and uploads between the device and a distant server while minimizing network traffic. This is accomplished by automatically prioritizing and throttling, as well as halting and restarting data flows.

BITS can be used to schedule downloads, prioritize various sorts of downloads, and download updates from Microsoft and third-party servers. Usually, BITS transfers files during your computer’s idle time. This implies that you won’t be able to use BITS if you’re doing something else on your computer. BITS will only work if no other programs are open and it is set to run in the background.
By the end of this article, you will be able to enable and disable BITS in Windows:
1. Enable or Disable BITS using Windows Services
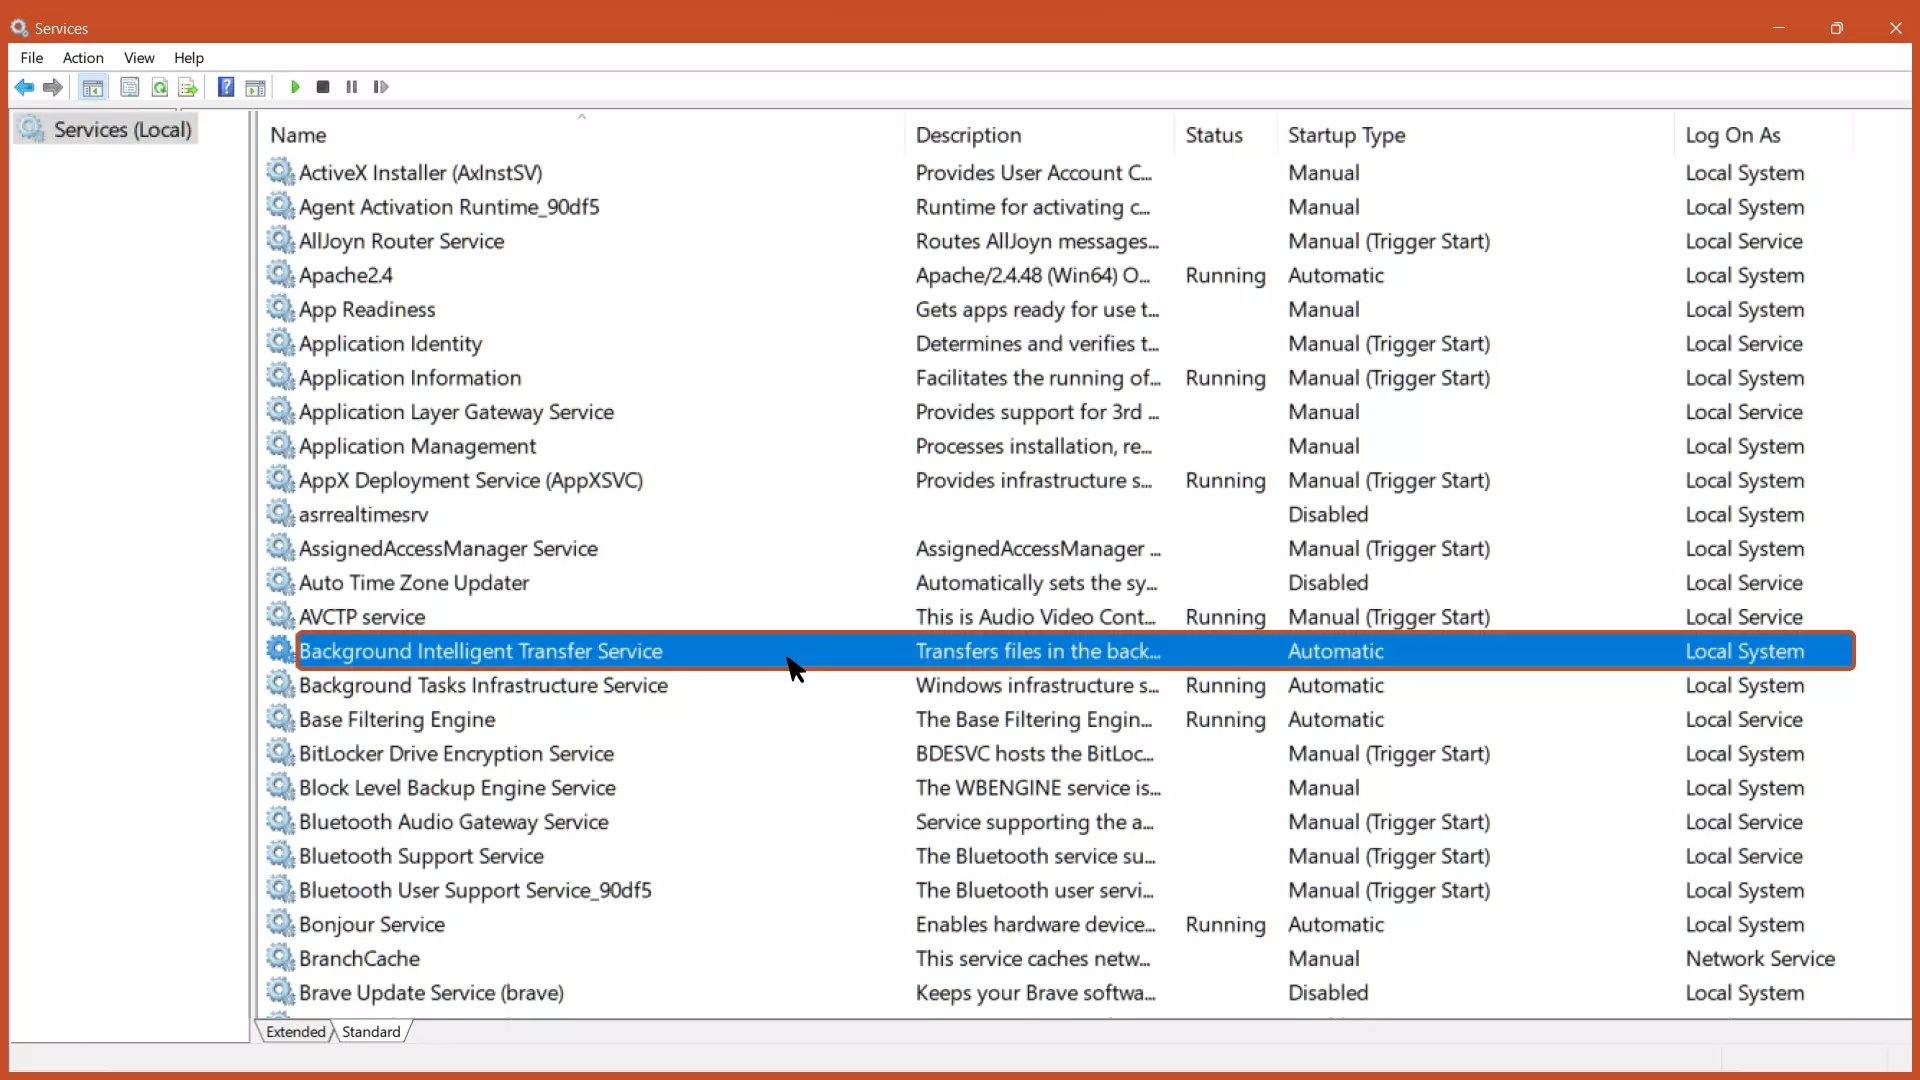
Step 1: Type and open “Services” app from the Start Menu or press the “Windows Logo Key + R” key combination to open Windows Run, type “services.msc” (without quotation marks) and hit the enter key.

Step 2: A list of services will appear in A-Z order. Scroll down, locate, and double-click the “Background Intelligent Transfer Services” option.
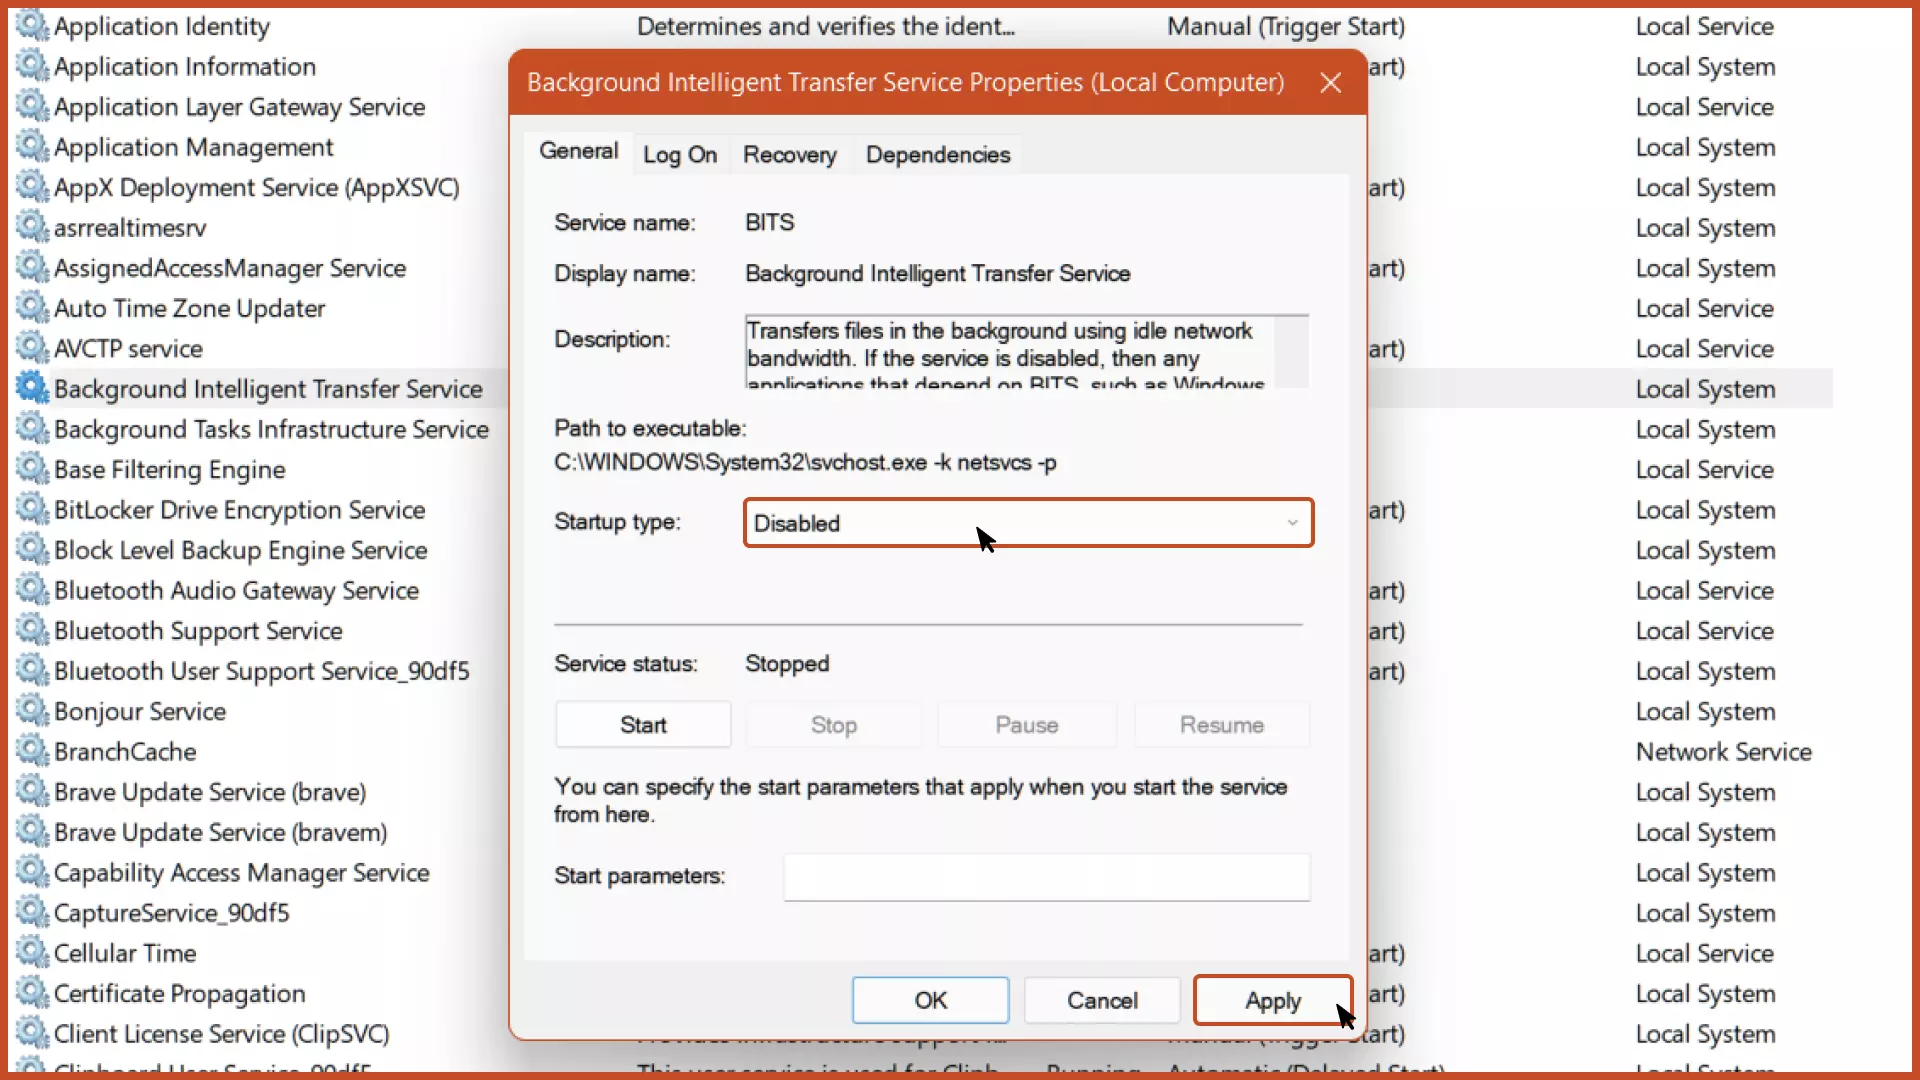
Step 3: Depending on your preferences, set the startup type to “Disabled” if you want to disable BITS and “Automatic” if you want to keep the BITS enabled in Windows.
Step 4: Restart the Windows to make changes take effect properly. The next time you boot Windows, the background intelligent transfer service will not start automatically and run in the background.

You can keep the service turned off as long as you want. To restart the BITS service, set the startup type to ‘Automatic’, reboot the device to make changes take effect, and the next time you boot your device, the BITS will start automatically.
If the service is disabled, then any applications that depend on BITS, such as Windows Update or MSN Explorer, will be unable to automatically download programs and other information (as discussed below).
2. Enable or Disable BITS using System Configuration
Step 1: In the Start menu, search for System Configuration and open it or press the “Windows key + R” to open Windows Run, type: “msconfig” (without quotation marks) and hit the enter.
Step 2: In the “Services” tab, locate the “Background Intelligent Transfer Service”. Uncheck it to turn it off; check it to turn it on and click the “Apply” button.

3. Enable or Disable BITS using Command Prompt
Step 1: In the Start menu, search for Command Prompt and run it as an administrator.
Step 2: To disable BITS using Command Prompt, type the command: net stop bits. To enable BITS, type the command: net start bits.


4. Enable or Disable BITS using Batch Script
Step 1: Right-click the desktop and add a new “Text Document” and double-click to open it.

Step 2: In the notepad, paste the following script to enable BITS:
@ECHO OFF
net start bits
pause
Paste the following script to disable BITS:
@ECHO OFF
net stop bits
pause


Step 3: Click the “File” button on the top bar and select the “Save as” button or press the “Ctrl + Shift + S” key combination on the keyboard.

Step 4: Rename the file extension from “.txt” to “.bat” and save it to desired location on your computer. Example: File-Name.bat

Step 5: Right-click the newly created “Batch Script” for disabling BITS service and run it as an administrator.
NOTE: The command requires administrator privileges. So, its important to run the batch script as an administrator, otherwise it’ll display an error.
5. Disable BITS using Group Policy Editor
Step 1: In the Start menu, search for Edit Group Policy and open it or press the “Windows Logo Key + R” key combination to open Windows Run, type: “gpedit.msc” (without quotation marks) and hit the enter key.
Step 2: Navigate to the following path:
Computer Configuration > Administrative Templates > Network > Background Intelligent Transfer Service and double-click the “Limit the maximum network bandwidth for BITS background transfers”.

Step 3: Select the “Enabled” option and set the “Limit background transfer rate (Kbps)” option to 0 and click the “Apply” button.

Pros of Disabling BITS in Windows
Reduced Internet Data Consumption
BITS consumes a lot of data in the background since it is continuously checking for Windows Updates and upgrading Windows to the latest version.
Reduced Bandwidth Consumption
Enabling BITS often increases bandwidth consumption and overuses server resources, resulting in increased internet usage, therefore disabling it will lower bandwidth consumption.
Increased Device’s Performance
When BITS is disabled, Windows will no longer search for Windows Updates in the background, and you will no longer receive Windows updates until the service is restarted, thus resulting in a significant performance boost.
Cons of Disabling BITS in Windows
Once the Background Intelligent Transfer Service is disabled, you will no longer be able to utilize some of the features listed below:
- AppSense: Uses BITS to install Packages on Client side.
- BITS Download Manager: Download Manager for creating jobs in Windows.
- BITSync: For File Sync on Server Message Block Network Shares.
- Civilization V: For downloading mod Packages.
- Endless OS installer for Windows: For downloading OS images.
- Mozilla Firefox: Uses BITS for fetching and installing updates.
- Novell ZENworks Desktop Management: Deliver program files to workstations.
- KBOX Systems Management Appliance: Uses BITS for delivering files to Windows Systems.
- Oxygen media platform: Distribute media content and software updates.
- RSS Bandit: Downloading attachments in web feeds.
- SharpBITS: Handling BITS jobs.
- Specops Deploy/App: Uses BITS and runs in background for delivering packages to clients.
- WinBITS: Download files by downloading BITS jobs.
FAQs Related to BITS
Should I disable BITS?
It depends on how you use your device; if you don’t use any apps that rely on BITS to function, you can disable the service; but, if you do use programs that rely on BITS, you shouldn’t.
What is the difference between disabling and stopping BITS?
Stopping the Background Intelligent Transfer Service (BITS) will terminate the service for the current session, whereas disabling it would disable it for all future sessions (unless you turn it on manually).
How to find if BITS is running on Windows?
Go to Task Manager > Select Services Tab > Scroll and locate BITS and check status whether it’s running or stopped.
Next Steps
So, considering the pros and cons, you can decide whether to disable or enable Background Intelligent Transfer Service in Windows.
Stopping or Disabling the BITS in Windows might block some other programs dependent on it for functioning.
Further, customize your device’s built-in settings by following the related articles below.
Related Articles

Limit Bandwidth in Windows 11
Learn how to limit bandwidth consumption in Windows and reduce the data consumption on your computer.

Clean Boot Windows 11
Clean boot the Windows to increase performance and fix common and advanced OS related problems
(Doesn’t involve files deletion).
Remove Cortana from Windows
Don’t use Cortana often? Uninstall it and save some space and memory.
Disable Windows 11 Widgets
Speed up Windows by turning off memory-consuming Widgets and allocate more RAM to the frequently used applications.
