Overview – Change Screen Resolution in Windows
The amount of pixels on a monitor display is referred to as screen resolution. It’s significant since it has an impact on the quality of the photos and videos you see on your device. If your monitor has a low resolution, everything displayed on it will be pixelated, however, the greater the resolution of your monitor, the clearer the visuals.
The screen resolution in Windows is used to determine the size of the display quality and the size of the window. When you launch a window in Windows with a specific screen resolution, it will be proportionally scaled to accommodate the screen. The window will be larger if the screen resolution is high and smaller if the screen resolution is low.
It appears that you’re either experiencing a screen size that is either too big or too small. By the end of this article, you’ll be able to set screen resolution in Windows 11:
1. Change Screen Resolution via Windows Settings
Step 1: Open the Windows Settings from the Start menu or press the “Windows key + I” key combination on the keyboard.
Step 2: Select the “System” tab from the left sidebar and click the “Display” button on the right pane.
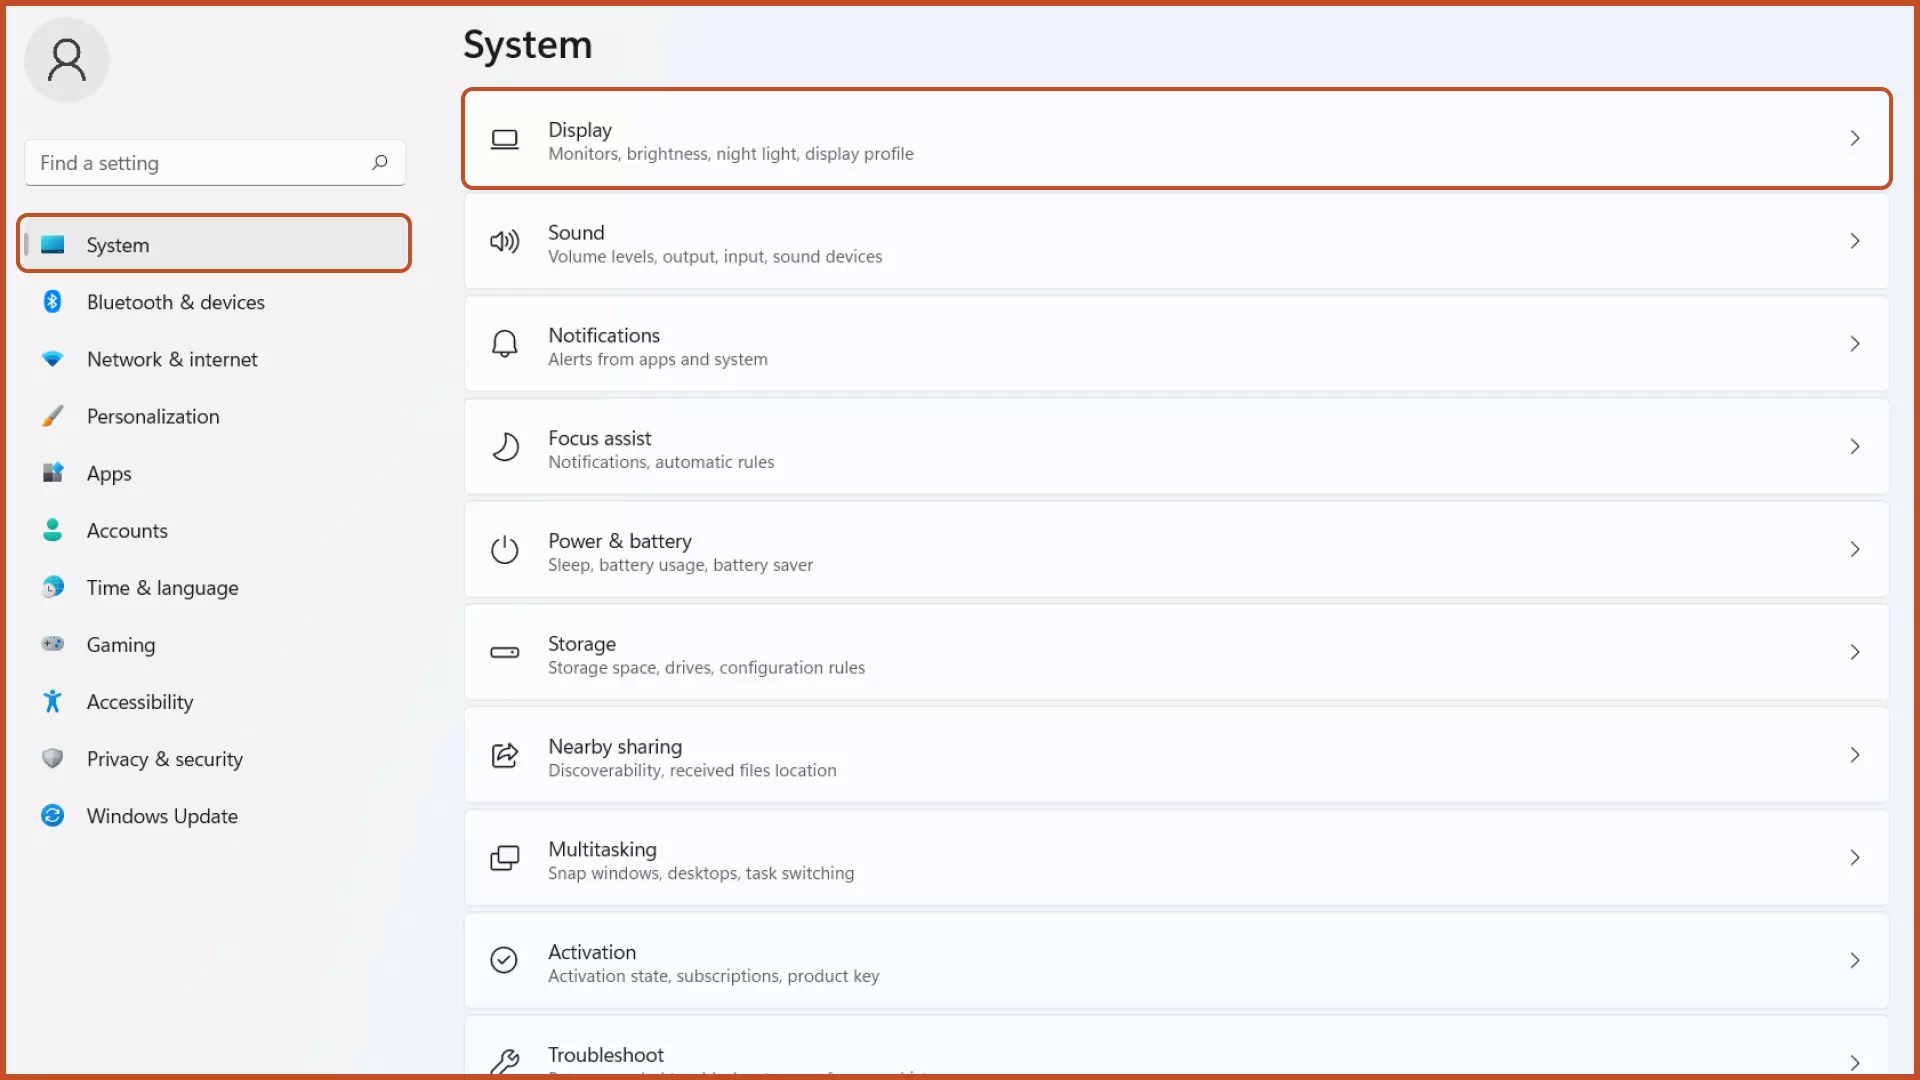
Step 3: Scroll and select the desired display resolution from the dropdown menu under the Scale and layout section.


2. Change Screen Resolution via Advanced Display Settings
Step 1: Open the Windows Settings from the Start menu.
Step 2: Select the “System” tab from the left sidebar and click the “Display” button on the right pane.
Step 3: Click the “Advanced Display” button under the related settings section.

Step 4: Expand the Internal Display section and click the “Display Adapter Properties for Display” option.

Step 5: Click the “List All Modes” button.

Step 6: Select the desired screen resolution and click the “OK” button to make changes take effect.

Note: To change screen resolution for multiple monitors, select the desired monitor for which you want to change the resolution in the Advanced Display section.
Suggested Article: Setup Dual Monitors in Windows 11.
3. Change Screen Resolution via Command Prompt and QRes Screen Mode Changer
Step 1: Download the QRes Screen Mode Changer from Source Forge.
Step 2: Extract the QRes Screen Mode Changer File to any location on your computer.
Step 3: Open the downloaded folder and copy the file path from the address bar at the top.

Step 4: Run the Command Prompt from the Start menu.
Step 5: Navigate into the QRes directory using the command: cd Copied-File-Path.
For Example: “cd C:\Users\TCZR\OneDrive\Desktop\qres folder\qrescd\sample-cd\qres\” (without quotation marks).

Step 6: To change the screen resolution, type the following command:
qres x=Width y=Height f = Frame-Rate“.
For Example: “qres x=1920 y=1080 f=60”.

Note: If the resolution settings are not compatible with your monitor, the QRes Screen Mode Changer will state an error message.
4. Change Screen Resolution via Intel Graphics Control Panel
Step 1: Right-click on the desktop and open the Intel Graphics Control Panel.
Step 2: Select the “Display” button.
Step 3: Select the “General Settings” from the left sidebar and change the display resolution from the drop-down menu on the right pane.
5. Change Screen Resolution via NVIDIA Control Panel
Step 1: Right-click on the desktop and open the NVIDIA Control Panel.
Step 2: Select the “Change Resolution” tab from the left sidebar, select the desired screen resolution from the list of available resolutions and click the “Apply” button.

Step 3: Click the “Yes” button if you want to save the changes, or click the “No” button if you want to revert changes, otherwise, the changes will be reverted automatically in 20 seconds.

6. Change Screen Resolution via AMD Catalyst Control
Step 1: Right-click on the desktop and open the AMD Radeon Settings
Step 2: Select the Display tab from the top bar.
Step 3: Click the “Create New” button under the Custom Resolutions section.
Step 4: Set the desired resolution (in pixels) and click the “Create” button. If the settings are compatible, the new configuration for display will be saved and shown in the Custom Resolution section.
7. Change Screen Resolution via Third Party App
Custom Resolution Utility (CRU)
Step 1: Download the Custom Resolution Utility (CRU) from the official website.

Step 2: Extract the zip file, four programs will appear, open the program file named “CRU.exe“.

Step 3: Click the “Add” button to create a custom resolution.

Step 4: Add the new resolution (in pixels) and click the “OK” button to save the profile in the list of resolutions.

Step 5: Single-click the recently created resolution and shift the profile to the top by pressing the “Up/Top Arrow key” icon on the right.

Step 6: Click the “OK” button. Now, double-click the “restart.exe” file that was downloaded earlier to restart the graphics driver and make changes take effect. Also, you can restart the PC to save changes.
Note: To change the screen resolution for another monitor, choose the desired monitor from the drop-down menu in the top bar.
8. Change Screen Resolution for Specific Program
Note: This method is feasible only if the program itself supports the lower resolution.
Step 1: Right-click the program for which you want to change screen resolution and click the “Properties” option.

Step 2: Select the “Compatibility” tab from the top bar, select the “Run in 640 x 480 screen resolution” option and click the “Apply” button.

Next Steps
We’ve covered how to change resolution in Windows 11. Depending on the ease of use, you can use any one of the methods listed above. Custom screen resolutions are only compatible with the monitor up to a certain limit, beyond which you won’t be able to change them. Once you’ve set the custom resolution, you can use the Online Screen Resolution Checker to ensure that the custom resolution is set correctly.
Improve your monitor’s display settings by referring to the related articles below.
Related Articles
Calibrate Monitor in Windows 11
Improve the color, contrast, RGB, HSL, and Gamma values to improve the display quality of the Monitor.
How To Rotate Screen in Windows
Rotate the Screen in Windows based on your monitor’s orientation (vertical, horizontal, or flipped).
Change Monitor Refresh Rate in Windows
Increase the number of times the monitor display is refreshed per second to improve the time taken to render graphics, textures, etc.
Virtual Desktops in Windows 11
Organize multiple projects on different desktops and improve your workflow and productivity by using Virtual Desktops.
