
Overview – Increase VRAM on Windows 11
Video Memory (or VRAM) was developed to solve the problem of stuttering frame rates while rendering graphics. Frames are only supplied to the display as they become available, so if the graphics processing unit (GPU) can’t render them quickly enough, then, CPU has to grab the remaining frames from VRAM, which is a part of GPU. Because you can’t save that picture indefinitely, the new frame must replace the previous one when it becomes available. The cycle is quick and constant, ends up going undetected by the observer.
It seems that you’re facing some issues regarding screen stuttering or some of your system requirements are inadequate to run some programs such as Photoshop, After Effects, Blender, etc, so you want to increase the VRAM to stop the error messages from appearing in the incompatible programs.
By the end of this article, you’ll be able to increase VRAM on Windows 11:
What is VRAM and Why to Increase it
VRAM (also known as video random access memory) is a buffer that stores data temporarily so that it may be retrieved rapidly by a graphics processor unit. By increasing the capacity of your VRAM, the frames will be rendered faster and you’ll notice less screen flickering and FPS-related issues while rendering graphics, gaming, and watching 4k videos.
Video RAM is an important component of the GPU since it stores all of the data that the GPU will process and produce in form of images and videos.
What Tasks Need More VRAM
1 GB – 3 GB VRAM: Required to run basic applications such as MS Office Apps, and games that don’t rely on memory extensive graphics, and hardware resources.
4 GB – 8 GB VRAM: For moderate video editing and 3D modeling that doesn’t demand a lot of VFX effects for rendering, as well as games that require a reasonable amount of resources to create mid-quality visuals. You should expect to utilize 1080p with some minor latency due to rendering difficulties. Most of the time, it’s adequate to render mid-level graphics utilizing Photoshop, Illustrator, and other similar programs.
More than 8GB VRAM: Ideal for video editing and 3D modeling, rendering complex textures and graphics as well as other memory-intensive applications and apps.
Check Available VRAM
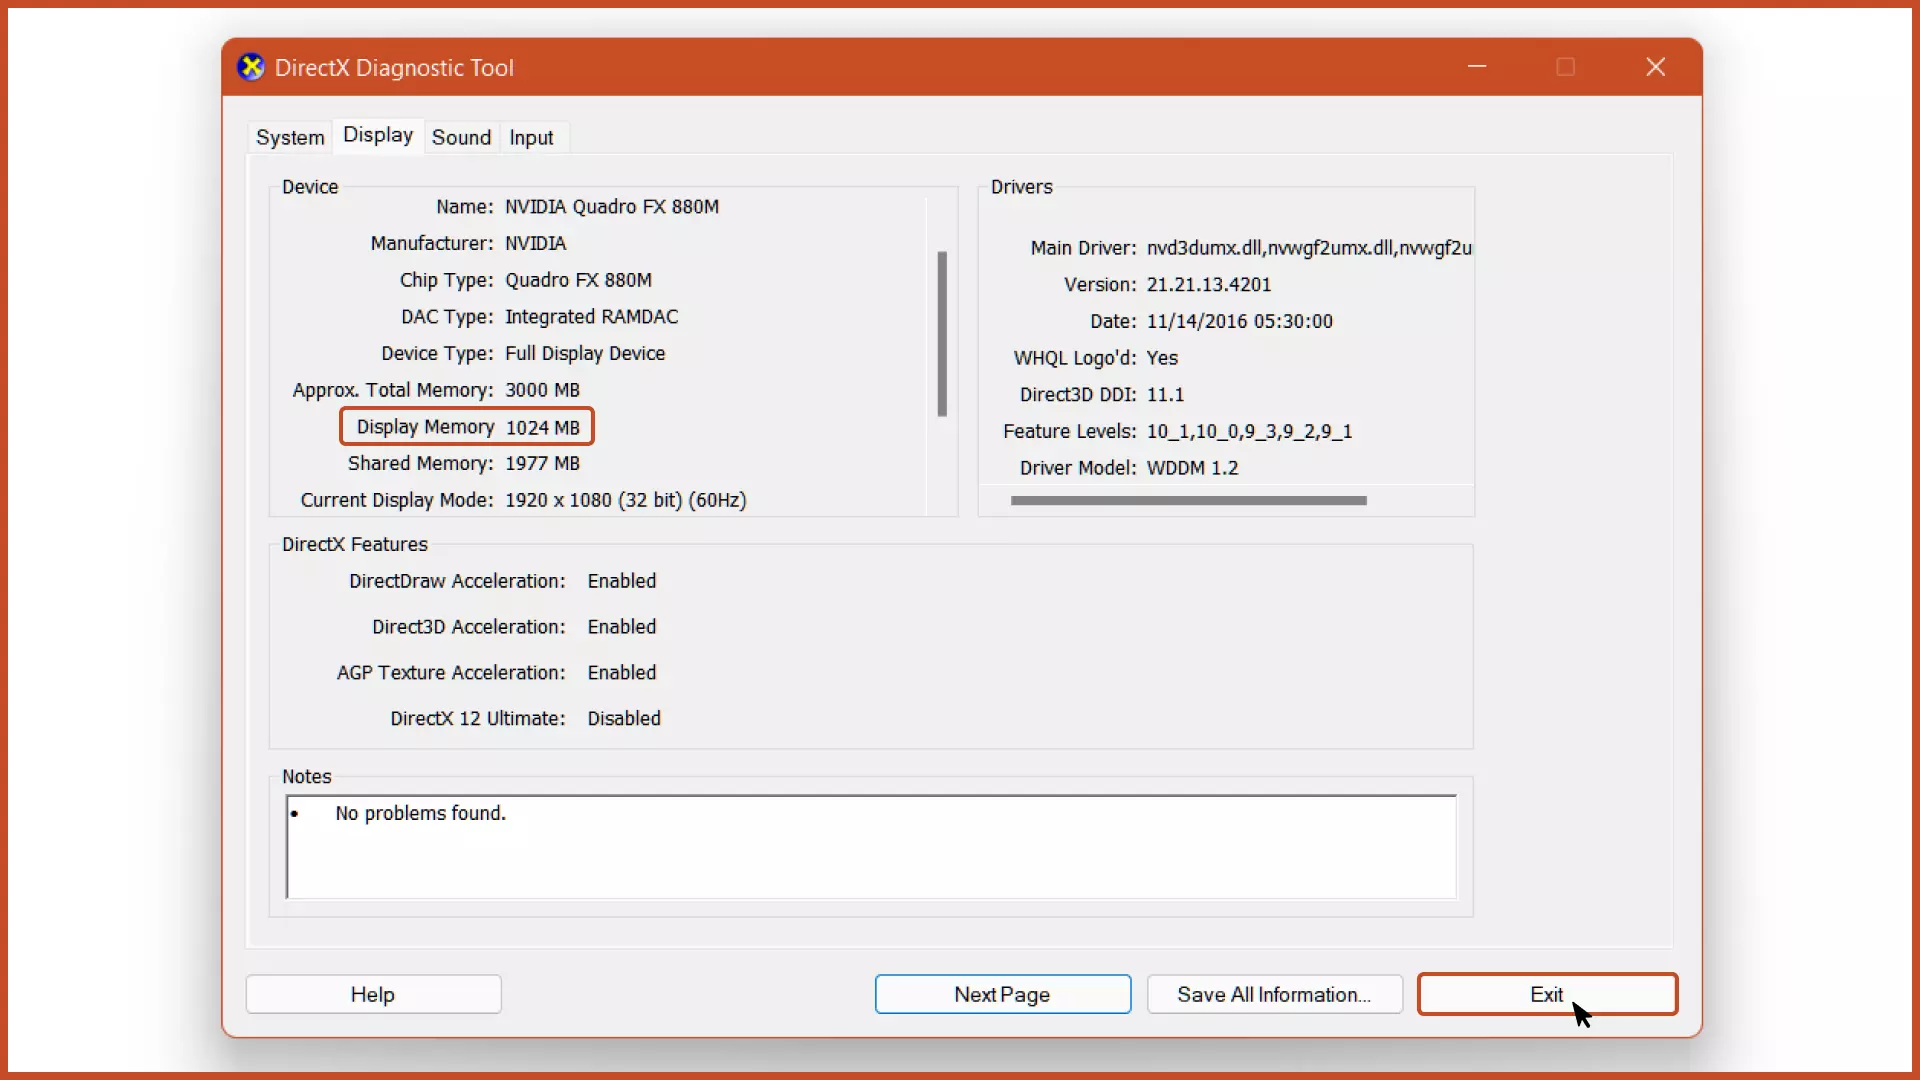
Step #1: Press the “Windows key + I” key combination to open Windows Run, type and open: dxdiag (DirectX Diagnostic Tool).
Step #2: Click the ‘Display’ tab on the top bar. Under the device section, you’ll find the “Display Memory (VRAM)”.
Read More: Check VRAM in Windows 11.
1. Increase VRAM using BIOS Settings
Step 1: Restart your computer, press the F2, F8, or F12 key to enter into the BIOS. If these keys don’t work, search for the steps to enter into BIOS on your motherboard.
Step 2: In the BIOS menu, locate options such as Graphics Settings, Memory Settings, or Video RAM Settings, usually found in the Advanced section.
Step 3: Select the “Pre-Allocated VRAM” option and choose the amount of VRAM that you want to allocate.
2. Upgrading Dedicated Hardware (GPU and CPU)
As we’ve discussed, VRAM (often known as the frame buffer) is a buffer between the computer CPU and the display. When images/videos are to be shown, they are first read as data from some type of main (non-video) RAM by the processor and then written to VRAM.
The CPU and GPU work synchronously to render frames to the display. The less the latency, the better the frames are processed and delivered to the display. If either the CPU or the GPU is underpowered, you’ll face delays and rendering difficulties. So upgrading the dedicated GPU and CPU will improve the graphics processing.
3. Get More VRAM using Command Prompt
Faking a VRAM Increase to run applications on the computer.
Step 1: Run the command prompt as an administrator from the Start menu.
Step 2: Type the command: bcdedit /set IncreaseUserVa Value and replace the Value with the amount of VRAM you want to allot.

Step 3: Restart your computer to make changes take effect.

4. Get More VRAM using Registry Editor
Faking a VRAM Increase to run applications on the computer.
Step 1: In the Start menu, type: Registry Editor and hit the enter key.
Step 2: Navigate to the following file path:
Computer\HKEY_LOCAL_MACHINE\SOFTWARE\Intel, right-click the Intel folder on the left pane and add a new key named GMM.

Step 3: In the GMM folder, on the right pane, right-click and add a new DWORD (32-bit) value named DedicatedSegmentSize.

Step 4: Double-click the DWORD value and add VRAM to be allocated (in MB) in the Value data field and click the “OK” button. To allocate VRAM, you can refer to the table below.

| System RAM | VRAM Value |
|---|---|
| 1 GB | 128 MB |
| 2 GB | 256 MB |
| 4 GB | 512 MB |
| 8 GB | 1024 MB |
| 16 MB | 4096 MB |
| 32 GB | 8192 MB |
Next Steps
We’ve covered how to increase VRAM in Windows 11. You can use any of the listed methods above to increase Video RAM in both NVIDIA and AMD GPUs.
Overall, we can conclude that it totally depends on your computer’s hardware (especially, CPU and GPU) capabilities on how much VRAM can you increase. Allocating more or less VRAM will again cause issues such as fragmentation,
Further, customize the computer’s settings depending on your preferences by referring to the related articles below.
Related Articles

Change Monitor Refresh Rate in Windows 11
Increase the monitor refresh rate for better FPS and rendering quality.

Allocate More RAM to apps in Windows
Allocate more RAM to specific apps in Windows 11 to improve its performance.

Delete Temp Files Automatically in Windows 11
Schedule/Automate the cleaning of temporary files in Windows 11 to improve your productivity.
