Overview – Startup Sound in Windows 11
You may have observed that when you turn on a Microsoft Windows computer, a sound is played. This is known as the Windows startup/logon sound. However, it seems that you are either frustrated listening to the same startup sound repeatedly or simply want to enable it because it is disabled on your version of Windows by default.
By the end of this article, you’ll be able to disable or enable startup sound in Windows 11:
1. Disable or Enable Startup Sound using Windows Settings
Step 1: Open the Windows Settings from the Start menu or press the “Windows Logo key + I” key combination on the keyboard.

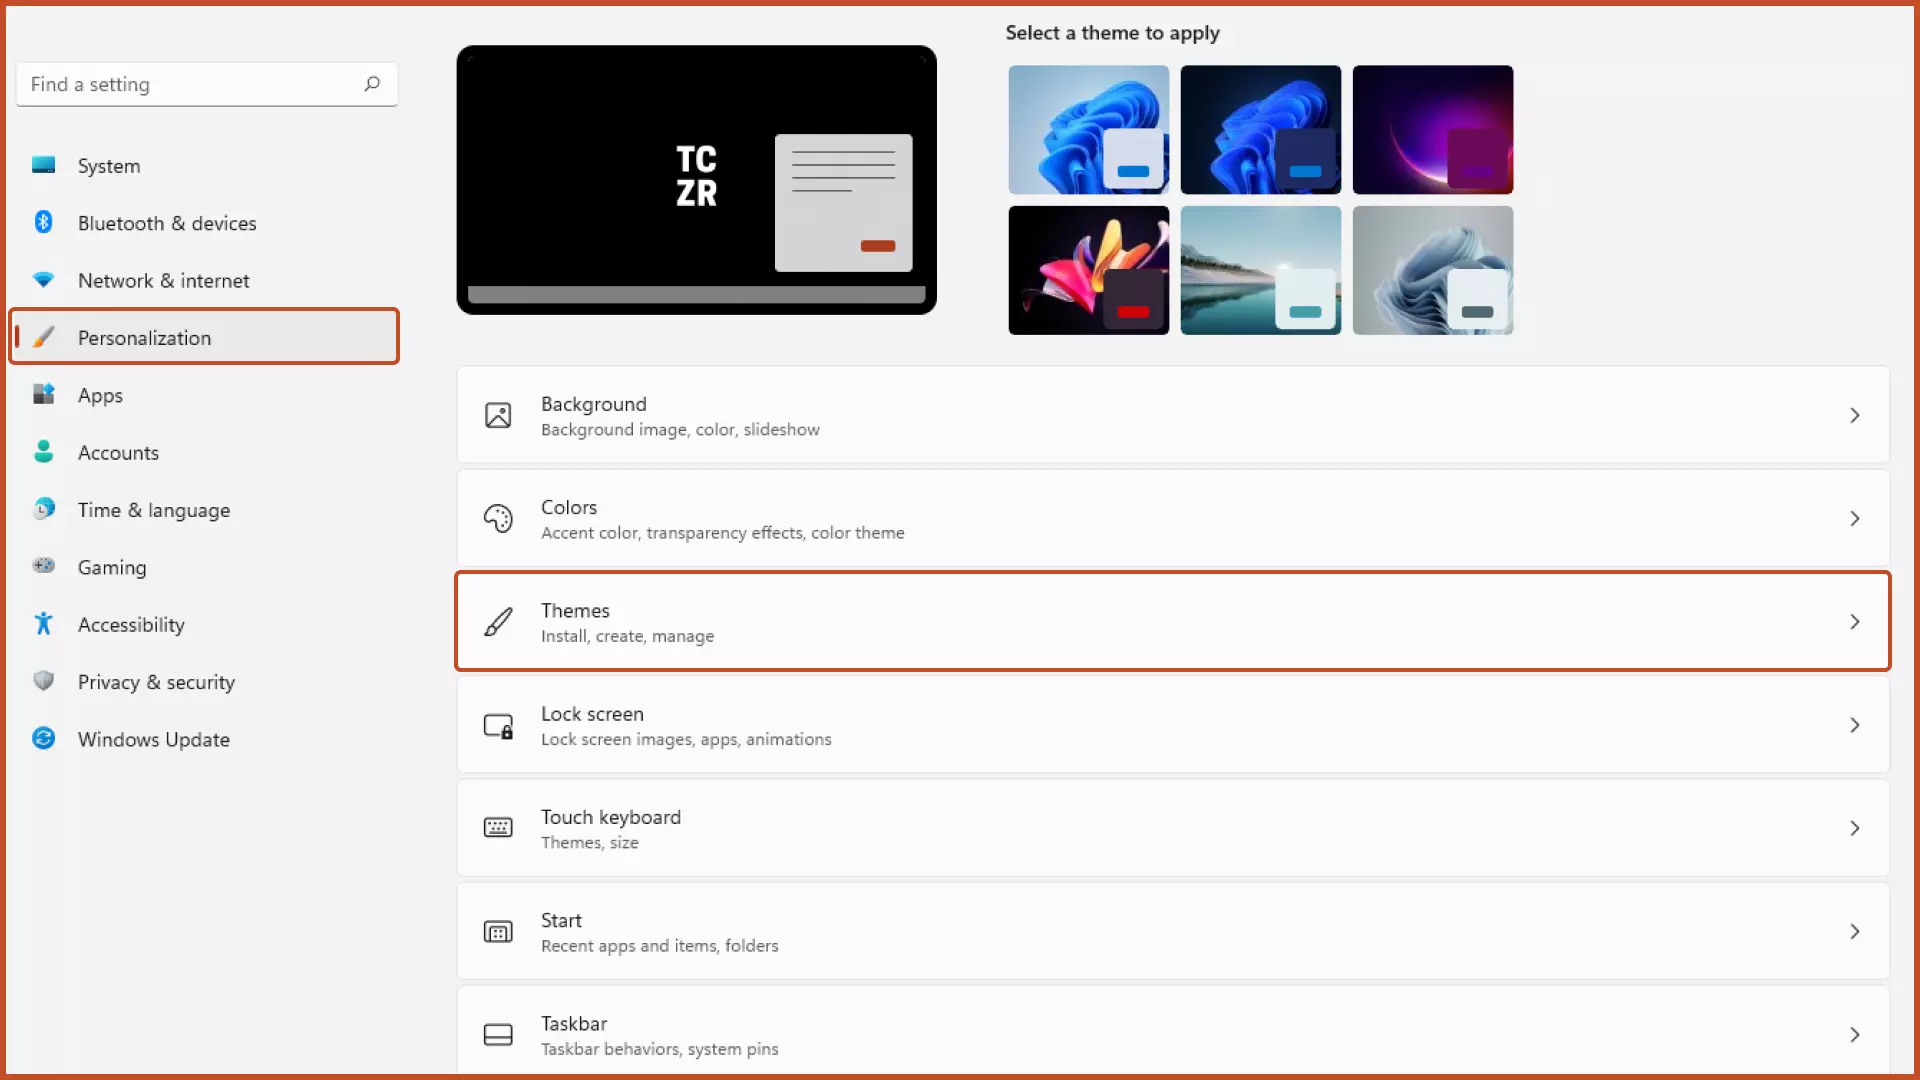
Step 2: Select the “Personalization” tab from the left sidebar and click the “Themes” button on the right pane.
Step 3: Click the “Sounds” button.

Step 4: To enable the startup sound, check the “Play Windows Startup sound” option and click the “Apply” button. Uncheck the “Play Windows Startup sound” button to disable it.

Note: If the “Play Windows Startup Sound” checkbox is disabled on your version of Windows, follow the Method 3 or Method 4 below.
2. Disable or Enable Startup Sound using Control Panel
Step 1: Open the Control Panel from the Start menu.
Step 2: Click the “Hardware and Sound” button.

Step 3: Click the “Change System Sounds” button.

Step 4: To enable the startup sound, check the “Play Windows Startup sound” option and click the “Apply” button. Uncheck the “Play Windows Startup sound” button to disable it.

3. Disable or Enable Startup Sound using Registry Editor
Step 1: Open the Registry Editor from the Start menu or press the “Windows Logo key + R” key combination to open Windows Run, type: regedit and hit the enter key.
Step 2: Navigate to the following path:
HKEY_LOCAL_MACHINE\SOFTWARE\Microsoft\Windows\CurrentVersion\Authentication\LogonUI\BootAnimation and double-click the DisableStartupSound value.

Step 3: To enable the Startup Sound using Windows using Registry Editor, set the “value data” from 0 to 1. To disable the startup sound, set the “value data” to 0.

Step 4: Restart your computer to make changes take effect. After restarting the computer, you’ll be able to configure the Windows Logon sound settings.

4. Disable or Enable Startup Sound using Local Group Policy
Step 1: In the Start menu, search for Edit Group Policy or press the “Windows Logo key + R” key combination to open Windows Run, type: gpedit.msc and hit the enter key.
Step 2: Navigate to the following file path:
Computer Configuration > Administrative Template > System > Logon and double-click the “Turn off Windows Startup Sound” option on the right pane.

Step 3: To enable the startup sound, check the “Not Configured” option and click the “Apply” button. To disable it, check the “Enabled” option.

Step 4: To save changes without restarting the computer, open the Command Prompt as an administrator from the Start menu, type the command: gpupdate/force and hit the enter key.

Next Steps
We’ve covered how to disable or enable Startup Sound in Windows 11.
The sound that plays when Windows boots up is known as the Windows startup sound. Windows 11 features a different startup sound than prior versions of Windows. Microsoft appears to be portraying a fresh new identity with Windows 11, therefore the starting sound is likely to have been modified, just as it was with prior versions of Windows from Windows 95 to Windows 10.
Further, customize your computer’s settings by referring to the related articles below.
Related Articles

Enable New Boot Animation in Windows 11
Still using the old windows boot animation. Learn how to enable the new 10x Boot animation in Windows.
Disable Notification on Windows 11
Tired of notifications appearing on the bottom right side of the screen? Learn how to disable them in Windows.

Delete Old Windows Folder
Recently installed the Windows 11? Delete a single folder and save 15-25 GB of storage.
